Archives For fountain

View from Fiesole

marylizingramart —  August 22, 2011 — 1 Comment

View from Fiesole, 24×36 commissioned pastel

This is the newest addition to one of my most gracious client’s collection of pastels. “View from Fiesole” will hang with the “Trevi Fountain” and the “Spanish Steps.” And there is one more pastel of Italy to come, so stay tuned!

The Trevi Fountain, 24×36 Soft Pastel

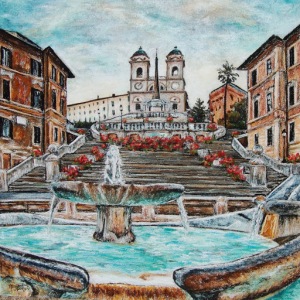
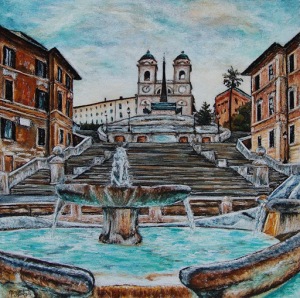
The Spanish Steps, 30×30 Soft Pastel

Many times, especially at art shows, I am asked about the fragility of pastels. True, if you wipe your hand across an unframed picture, you will smear it. True, if it rains on a picture, it will mess it up. BUT…you can fix it! There have been several big “accidents” in my 3 years of pastel-painting:

1) when spraying a fixative on a 4×4 portrait with a can of spray that was clearly running out, I gave it a test and decided to go for it and ignore the omen of splatters. I gave it a quick spray…um, make that a big splatter. After chunking the can across the yard and kicking a newspaper (to my neighbors’ amusement, I am sure), I took my darkened and spotty picture inside and touched it right up with some light layers of flesh tones and any needed details. Frustrating, yes; big deal to correct, not so much.

2) After delivering a finished pastel to a client, the piece fell victim to a big drip of rain water off of her porch. She brought it by and it was quite a drip– a big, dark circle right in the center of the subject. I took it in the art room while she waited, and in a matter of minutes it was repaired. I just covered the dried spot right up with the same color blue.

3) One of my “precious” (note sarcasm here) cats decided it would be a fabulous idea to jump on my art table, walk on a very large pastel painting, put black footprints in the sky, scratch down the middle as the picture slid, and slide right down off the side. Awesome. I found the culprit by inspecting dirty, furry feet. In this case, I blew off the excess dust outside, then went to work layering the appropriate color pastel to cover up the paw-prints and smears. Good as new (but maybe not my mood)!

I’ve gotten a bit more careful, especially when spraying. I steer clear of rainy days and keep my pastels inside or covered; I make sure to seal them up to keep fingers (and cats) off of them.

Recently, I have used this comfortable knowledge of pastel’s ability to cover mistakes to make some alterations to a commissioned piece. Before I began the Spanish Steps (30×30 pastel), the decision over whether or not to include flowers on the steps was not firm. I told my clients that I could add them later if they wanted, after they saw the finished piece. We did decide to add some red flowers, and while doing so I made a few other corrections. Below is the piece with alterations, and the piece before the additions. Pastel covers well, and is not as fragile as you may think! How many differences can you spot?

The Spanish Steps

marylizingramart —  March 11, 2011 — 1 Comment

After a few weeks, the Spanish Steps are finally complete!


Since the piece is so large and bulky (30×30″), I moved my workspace from my art desk to my kitchen table, propping it up on a makeshift platform of a pastel box and French box easel. I used the grid method to make sure I got this technical subject correct, checking angles and being careful to keep my lines straight. I use a grid, dividing the space into quarters first and then lightly into 16 spaces, only occasionally when enlarging to such a great extent. I sketch first with pencil, making only a few corrections by pressing with a kneaded eraser (never rubbing as it damages texture); I just draw over “mistakes” rather than spend time erasing, since the pastel will cover any marks-gone-awry. Over the correct pencil marks, I redraw with a charcoal pencil to give it more substance and to ensure no parts get “lost” in the vibrant pastel.


After the Spanish Steps were drawn and my area prepared, I began layering the pastel. Working on my self-prepared Pastel Ground surface proved different than I first expected. To the touch, the texture felt fine and grainy like a Pastelbord, but when I began applying the pastel for my sky, I found it more bumpy than sandy. At first I was frustrated working with such a rough texture that showed every pastel stroke. As I moved on to the rust-colored buildings, I embraced the difference of surface and adjusted my application to a more Impressionist-like, unfinished stroke, and with perseverance, am finally satisfied with the result.

I like the roughness I see when I look closely at the fountain, and it reminds me of some of Degas’ gritty looking pastel drawings. In the future, I will choose my surface based on the result I seek, adding Pastel Ground into the mix when I am looking for a deeper texture. This project was a learning experience and I am pleased to have been able to “experiment” a bit more than usual.

The Trevi Fountain

marylizingramart —  December 18, 2010 — 2 Comments

The Trevi Fountain
24×36 Soft Pastel

I have spent the past several months working away on many commissions…portraits, dogs, flowers, and even a fish. Since most will be Christmas gifts, I cannot share them until after the holidays, but the largest one can now be displayed. This large pastel of the Trevi Fountain in Rome was a very triumphant piece for me. When I normally create a piece of art, I have many moments of “completion,” which bring a sense of accomplishment and energy: the sky is finished, the tree line complete, the grass is in place, etc. On the Trevi Fountain, where almost the entire piece is one unit, I worked for several days, layering colors, never completing any area. The whole 24×36 inch board was unfinished until I put on those last highlights…then “ta da!” it appeared. All that was left was the bright aqua water swirling beneath the impressive figures perched upon the rocks.